Thursday, April 25, 2013

Sorry

      Sorry I've been quiet this week. I think I'm suffering from blogger's block. I have ideas pop in my head and then think "no that's dumb no one wants to read that" I guess that means I need another project :-) I'm sure Kev would not agree with that.
       
      I'm starting to get the itch to plant flowers and hanging baskets. I love spring and getting my yard and porch ready for the nice weather. Our front porch and yard become an expansion of our living room in the spring and summer. We've tried sitting in the backyard but get bored since we like to people watch.

      Well there's my post about nothing. Next week will be better I promise.
    
       Oh and i wrote this on my phone while nursing the baby (who will be a toddler in a week) so I hope i caught all the type-o's. :-)
Until next time
Tish

Tuesday, April 16, 2013

Easter Candy Overload

Easter Candy Overload

Why is it year after year we insist on buying pounds and pounds of candy at easter. Why do we think that celebrating our salvation means buying 5 pound chocolate Easter Bunnies and bags of jelly beans and oh my favorite the Cadbury Mini Eggs. So we buy all this candy every year and then what, it sits in candy dishes or in our case a giant bowl in the cabinet. I get so sick of it sitting there begging me to eat it. What do you do with all that extra candy? A few years ago I decided to start a new tradition. I started making cookies with all the chocolate candy. I chop up the Cadbury Mini Eggs, the peanut butter cups, the Hershey Kisses and even the beloved chocolate bunny and throw it in a batch of chocolate chip cookie batter. We call them bunny cookies. I also do this at Halloween with all the Halloween candy. Those we call monster cookies. This year we had so much candy though that I had I was trying to come up with other uses for it so I made a batch of pancake batter and made Easter candy pancakes with all the chocolate I chopped up the Easter bunny for that one too. this year I have made 3 batches of cookies and 1 batch of pancakes and we still have gobs and gobs of candy. 
This is after the 3 batches of cookies and 1 batch of pancakes ugh

Here are my recipes for the cookies and pancakes. If you need some good ones these are great

Pude's (That's what they call my father-in-law) Chocolate Chip Cookies
2 1/2 cup flour      1 tsp salt      1 tsp baking soda
1 cup butter flavor crisco    3/4 cup sugar    3/4 cup brown sugar
1 tsp vanilla       2 eggs         12 oz chocolate chips 
(I used chopped Easter candy)
Preheat oven to 375. Cream sugars, eggs, Crisco (I've used real butter and margarine in a pinch but Pude says that is a no no and Crisco is a must) and vanilla until fluffy. Mix in dry ingredients and add chocolate chips. Drop on cookie sheet and bake for 8 to 10 minutes (I've been told 8 1/2 minutes is the magic amount of time for perfect cookies)

Fluffy Pancakes
2 cups flour           2 Tbs sugar           1 Tbs and 1 ts baking powder
1 ts salt       2 eggs      1 1/2 cups milk      1/2 cup vegetable oil
chopped up Easter candy or chocolate chips
Mix all together and cook on lightly greased griddle 


Thursday, April 11, 2013

Painting My Countertops


The scariest thing I have ever done

We bought our house about 7 years ago and I have hated the countertops the whole time. I so wanted to buy new ones as soon as we moved in but alas things came up and money got spent on other things. They're just countertops, not exactly top of the priority list. A few years ago a friend of mine and I found all these blog posts and videos about painting countertops. I was all for it but then couldn't convince Big Daddy Kev (again that's how I'm to refer to him) that it would work and was as great of an idea as I thought it was. I kept revisiting the idea of painting them but then would chicken out until this week. I started out thinking I would spray paint them. Then I started pricing the price of the stone look spray paint I wanted and worried about spraying that much paint in our house. Then I looked into one of those kits you can get at Lowes (let me tell you when you tell them what you are thinking of doing they will walk you right in that direction) but after some online research  I learned that though the box says it will cover however many square feet turns out they don't cover as much as they say they do. I was looking at close to $500 for 2 of these kits. So I decided to look into the sponge painting technique that I remembered reading about way back when. Well that's what I decided to do. I started out with my bar because for some reason it didn't sound as scary. So here goes nothing. Please remember I really have no idea what I'm doing I'm just kind of winging it and looking at how different people did it. 

Once you clean your countertop really well you are going to want to use a primer like this on it. This is a quick drying, no sanding required water based primer.


This is after 1 coat of primer. I just used a cheap $0.89 paint brush to brush it on. I wasn't worried about brush strokes since I was going to being adding so much color and texture. Let this dry for an hour or 2 and then you can add another coat

After the second coat was dry I started adding color. You may want to do a third coat of primer but I was too excited/scared and wanted to get started/over with. As you can tell I was using super fancy stuff for this project. You can use whatever you want to get the paint on. I've see people use real sponges, fake sponges and  paper towels. I even watched one lady take a paint brush and splatter the paint on. I was out of paper towels and didn't have sponges on hand or any extra tooth brushes so I cut up an old kitchen towel. 

Looks great huh. Yeah not so much, at this point I was having a holy crap what am I doing moment. As you can see in the picture I covered the whole thing in a tanish creamish color and then started adding in darker brown.
Here it is with the darker brown all over. The paint I'm using is just basic craft acrylic paint. You could also use regular paint you would use to paint your walls, or what ever you have on hand. I happened to  have this paint on hand so that's what I used. At this point I was still freaking out but I kept telling myself to just get the next layer on and it will be fine. 

Here it is with black added in and getting ready to add some white. You just keep adding colors and layers and blending until you like what it looks like. This was my "hey this may actually start looking nice" moment

I decided I wanted it a little darker but really this looks good and I could have left it alone.
But I didn't so here it is a little darker

Time for polyurethane. I used a water based poly but you could use oil based if you want. I've also seen where people use a two part epoxy but I've never messed with that stuff and it sounded scary to me so I went with the polyurethane. I did about 6 coats. Can you see the glitter on it?? I used just a bit of spray glitter on it just to give it a little sparkle.

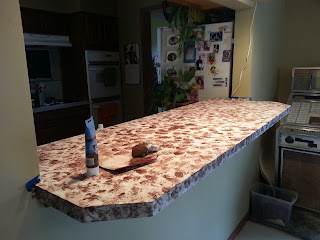
Voila here it is after all the coats of poly. I think it turned out pretty good and I am so proud of it. 
One thing I did figure out worked better was to work in smaller sections, it just seemed to work a little better. Yes I did a "happy, I did it, I am awesome" dance :-). Is it perfect? Um no. But do I love it?? YES!!!

On to the next project!!

I'm a DIYer!!!!!!! eeeeeeeek (that's my excited squeal) 

I will post more pictures from my finished kitchen later. You can so do this. I promise!! Feel free to post questions if you have any. Have a great day 
Tish


Here are a few links to other tutorial http://brookeisfindinghome.blogspot.com/2011/03/painting-counter-tops-complete-tutorial.html?m=1 http://www.creativekristi.com/video-tutorial-how-to-paint-your-countertops-to-look-like-granite/

Wednesday, April 10, 2013

We Have A Crawler


Heaven Help Me We Have A Crawler

      Well it took almost 11 months but we have a crawler and he's already figured out how to get into everything. He was just starting to figure it out and Big Daddy Kev (remember that's what he wants me to call him) and I were standing half cheering half crying not only crying because, where has our baby gone but crying because we knew once he took off he would be everywhere!! Oh well it adds some fun to our life. So far he has found the dvd cabinets, buffet doors oh and the dog food (Yumm). His big brother QJ was working with him going up the stairs tonight, gosh I hope he doesn't pick that up any time soon we have far too many stairs for him to get in trouble on. Well I am working on a few big blog post for the upcoming weeks so sorry this isn't very long but I will end with a few pictures of our into everything crawler.

Wednesday, April 3, 2013

Lemon Meringue Pie

This is THE most amazing Lemon Meringue Pie EVER!!
First you will need to make (or buy, I make) whatever pie crust you like. You can see in my pictures when I roll mine out I put it between two pieces of plastic wrap (wax paper works too) the crust doesn't stick and it makes it easier to transfer to your pie pan. Once it is trimmed and fluted you will want to bake it for about 10 min at 350.
                  Lemon Meringue Pie
1 1/2 cups water.     2 lemons.     1 cup sugar
2 tablespoons flour 3 tablespoons cornstarch
1/4 teaspoon salt. 2 tablespoons butter (real butter) 4 egg yolks
In a mixing bowl add the water and zest and juice of the lemons. In a medium-sized sauce pan add all the dry ingredients. Pour the lemon juice mixture into the saucepan with the dry and whisk well. Cook on medium heat until it boils, stirring occasionally. While that cooks separate 4 eggs the yolks into a bowl and the whites into your mixer bowl. (I make the meringue while I wait for the other to boil. I will do the recipe for that in the next paragraph) Once the filling boils add your butter and let it melt. After the butter melts you will need to temper your egg yolks by adding about a half a cup of the filling to the egg yolks and mixing it up. Add the eggs to the filling and heat until thickened while stirring. Once the filling it thickened pour it into the pie shell and top with the meringue. Bake in your preheated 350 oven until the top has some golden brown coloring on it. 

             Meringue
4 egg whites 6 tablespoons sugar
place egg white in mixing bowl whip on high until it get frothy add sugar and beat on high until it is stiff and peaks form when you lift the beater out. Sometimes if I want extra I add a couple extra egg whites and a little move sugar. 
          My Pie Crust
1 1/2 cups flour   1 stick plus 2 tablespoons butter (the real stuff and make sure you keep it COLD) 
1 teaspoon salt    1 to 3 tablespoons ice water (yes it needs to be ice water!!)
Cube butter into small cubes. Mix flour salt and butter (I do it in my Kitchenaid) and water 1 tablespoon at a time until dough forms. You can't screw this up I promise!! 

This is one of my favorite recipes, it's one of those recipes when I make it I know it's good. I made it for a few Easter get togethers and got lots of compliments on it. I actually replied with a "I know" to a few of them. The filling on this almost tastes like lemon Starburst candy. I've also switched out the lemons and replaced them with limes and it tasted really good. I did use 3 limes instead of 2 because they were smaller.


Sorry the pictures aren't in order. They were in order when I put them on from my phone. I don't know what happened and I'm not a pro at this yet.


Monday, April 1, 2013

12 Years of Wedded Bliss

12 Years come and gone

Where does time go?  I've been thinking that question a lot lately. My husband and I celebrated our 12th anniversary yesterday (March 31st). I can not believe we have been married so long. I think back to that fresh faced 17 year old girl who first set eyes on the one that would be her husband. Would she ever believe that she would end up with him as her happily ever after? Would she believe that he would give her 3 beautiful boys? Would she believe that the guy she had a crush on for so long would end up hers forever? Probably not but that is what happened. When I first saw Kevin I instantly had a crush on him, he was very "hot" and had that "bad boy" appeal. We became friends and hung out almost every weekend for several months finally I worked up the courage to ask him out. I remember saying "let's give it a shot and see what happens" he answered with a "no" I remember him saying he valued our friendship too much to ruin it if a relationship didn't work out. I understood and agreed and went home for the night. A day or two passed and he called me up and said he had thought about it and wanted to give it a try. That's how it all started. We dated for 2 years before we got engaged, I know a lot of people probably thought we were crazy for getting married so young I was 20 and he was 23 but we knew we wanted to be together and live our lives together so why should we wait just because we were young. So here we are 12 years later still happy (most of the time) and just as in love as we were when we got married. I am truly blessed to have him as my husband. 
Thank you babe for the last 12 years I can't believe you have put up with me for so long.
Here's to another 12 
and then another 
and another 
and another 
and another 
and another 
Love you more than you know