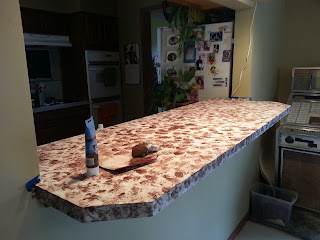
The scariest thing I have ever done
We bought our house about 7 years ago and I have hated the countertops the whole time. I so wanted to buy new ones as soon as we moved in but alas things came up and money got spent on other things. They're just countertops, not exactly top of the priority list. A few years ago a friend of mine and I found all these blog posts and videos about painting countertops. I was all for it but then couldn't convince Big Daddy Kev (again that's how I'm to refer to him) that it would work and was as great of an idea as I thought it was. I kept revisiting the idea of painting them but then would chicken out until this week. I started out thinking I would spray paint them. Then I started pricing the price of the stone look spray paint I wanted and worried about spraying that much paint in our house. Then I looked into one of those kits you can get at Lowes (let me tell you when you tell them what you are thinking of doing they will walk you right in that direction) but after some online research I learned that though the box says it will cover however many square feet turns out they don't cover as much as they say they do. I was looking at close to $500 for 2 of these kits. So I decided to look into the sponge painting technique that I remembered reading about way back when. Well that's what I decided to do. I started out with my bar because for some reason it didn't sound as scary. So here goes nothing. Please remember I really have no idea what I'm doing I'm just kind of winging it and looking at how different people did it.
Once you clean your countertop really well you are going to want to use a primer like this on it. This is a quick drying, no sanding required water based primer.
This is after 1 coat of primer. I just used a cheap $0.89 paint brush to brush it on. I wasn't worried about brush strokes since I was going to being adding so much color and texture. Let this dry for an hour or 2 and then you can add another coat
After the second coat was dry I started adding color. You may want to do a third coat of primer but I was too excited/scared and wanted to get started/over with. As you can tell I was using super fancy stuff for this project. You can use whatever you want to get the paint on. I've see people use real sponges, fake sponges and paper towels. I even watched one lady take a paint brush and splatter the paint on. I was out of paper towels and didn't have sponges on hand or any extra tooth brushes so I cut up an old kitchen towel.
Looks great huh. Yeah not so much, at this point I was having a holy crap what am I doing moment. As you can see in the picture I covered the whole thing in a tanish creamish color and then started adding in darker brown.
Here it is with the darker brown all over. The paint I'm using is just basic craft acrylic paint. You could also use regular paint you would use to paint your walls, or what ever you have on hand. I happened to have this paint on hand so that's what I used. At this point I was still freaking out but I kept telling myself to just get the next layer on and it will be fine.
Here it is with black added in and getting ready to add some white. You just keep adding colors and layers and blending until you like what it looks like. This was my "hey this may actually start looking nice" moment
I decided I wanted it a little darker but really this looks good and I could have left it alone.
But I didn't so here it is a little darker
Time for polyurethane. I used a water based poly but you could use oil based if you want. I've also seen where people use a two part epoxy but I've never messed with that stuff and it sounded scary to me so I went with the polyurethane. I did about 6 coats. Can you see the glitter on it?? I used just a bit of spray glitter on it just to give it a little sparkle.
Voila here it is after all the coats of poly. I think it turned out pretty good and I am so proud of it.
One thing I did figure out worked better was to work in smaller sections, it just seemed to work a little better. Yes I did a "happy, I did it, I am awesome" dance :-). Is it perfect? Um no. But do I love it?? YES!!!
On to the next project!!
I'm a DIYer!!!!!!! eeeeeeeek (that's my excited squeal)
I will post more pictures from my finished kitchen later. You can so do this. I promise!! Feel free to post questions if you have any. Have a great day
Tish


Not bad for a first timer. Your counter top looked like it is a genuine granite. And aside from that, it matched the color of your wall. But to make the paint and effect last long, it would be advisable to apply a protective coat.
ReplyDeleteWoodsCustomKitchens.com
I feel awful I never replied to this!! Thanks for the nice comment it's been around 4 years since I did these and they have held up really well. Well on the side that I did the 6 to 8coats on the other side I got lazy and only did 4and they have chipped. Oh well it's just paint and they can be redone :)
Delete